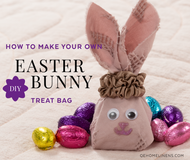
How To Make Your Own DIY Easter Bunny Treat Bag
2022 Apr 7th

Easter is coming close, which usually means three things: chocolate, candy, and soft bunnies everywhere.
There are endless treats to give to your little ones, and plenty of ways to decorate your house for the holidays, but why not combine them and make something together while you’re at it?
If you feel like getting crafty with your little ones, then this DIY idea is just what you’re looking for! With just a little folding & crafting time, you can quickly build a bunny family that’s sweeter than the treats it’ll hold inside!
What You’ll Need

- Old Sheet / Pillowcase
- Small Scrunchie
- Scissors
- Any Small Candy
- Decorations for Faces
For the most part, these soft little buns can be made with things you’re sure to already have in your house. Besides the tools, the main thing you’ll need is an old sheet or pillowcase you feel comfortable parting with! Just make sure that for anything you plan on cutting up, you have another fresh new bed sheet or pillowcase to replace it with.
For the facial decorations, we recommend having some colourful glitter glue to draw with, and a nice set of googly eyes. If you don’t have any on-hand, any arts & crafts supplies like glue & construction paper work just as great for your bunny’s beautiful face.
Step 1: Cut Your Fabric

Before you & your little ones start building bunnies, you’re going to need some fabric to make them with. Using your scissors, cut a small square out of your old bed sheet or pillowcase, no bigger than 20cm on each side. Any bigger, and your ears might flop a little too low!
If you feel like being a little extra, you can cut two squares instead and sew them together for some extra tidy edges! Simply fold the sides in and sew them shut, and you’ll have some firmer & cleaner fabric to work with.
Step 2: Stow Your Candy

Lay your square fabric flat on the floor in a diamond shape. Then, place your candy in the centre, and fold the top corner over before tucking it underneath the candy.

Step 3: Perk Up Your Ears

It may not look like it, but the edges of your fold will soon become your ears! Lift them up by the corners and pinch them together in one hand, keeping the candy as centered as possible, then grab your small scrunchie. Just like a ponytail, use it to pinch the ears together just above the candy, and pull on the ears to flare them out!

Step 4: Find Your Face

With your ears in place, pull up the front-facing flap and tuck it under the scrunchie, and push the sides behind. This should give a flatter surface to one side and help the ears stay firm, giving you a blank baby bunny full of candy!
Step 5: Make It Your Own!

Last but not least, it’s time to add the finishing touches! Your final fuller surface is where your face will show, with whatever decorations you might have.
If you’re not feeling fancy, you can always just toss on a quick pair of googly eyes, but brighter colours will help your facial features pop! Try finding some glitter glue to give your nose & mouth a nice bright smile, and don’t be afraid to add stickers or sparkles for an extra bit of flair.
If you do choose to use glitter glue, make sure to give it some extra time to dry. Leaving it by an open window or in sunlight should help it solidify slightly faster, but be careful not to let the chocolate melt in the heat!
Once you’ve made your bunnies, how you’d like to use them is up to you! They make for great things to hide around the house if you want to liven up your Easter Egg hunt, and they also make for a great way to give someone a small gift. These buns can run free as your imagination!

If you want to stay tuned for more seasonal DIY ideas, subscribe to our mailing list so we can keep you posted on all our best seasonal crafts! Plus, be sure to also check out any of our 75+ stores, so you can easily replace all the old sheets and covers you just used for your gifts.
Have a Hoppy, Happy Easter!

